Building a self-driving RC car is an engaging STEM project that introduces key concepts in robotics, electronics, and programming. Research suggests that hands-on kits like these can effectively teach beginners, though success depends on following tutorials closely and troubleshooting patiently. It seems likely that starting with affordable Arduino-based options suits most novices, while advanced users may prefer AI-focused Raspberry Pi kits. Evidence leans toward kits with strong community support for better learning outcomes, but note that product availability and prices can fluctuate—always verify current details.
Key Points
- Essential Components: You’ll need a chassis, motors, controller board (e.g., Arduino or Raspberry Pi), sensors (ultrasonic for obstacle avoidance), and power sources like rechargeable batteries.
- Recommended Kits: Popular beginner options include the OSOYOO Model 3 (around $50, Arduino-based for simple assembly), Freenove Robot Ant (around $62, unique hexapod design for creative programming), and XiaoR Geek Donkey Car (around $229 including Raspberry Pi, for deep learning and autonomous driving).
- Assembly and Programming: Follow step-by-step guides; basic code uses if-then logic for sensors, while advanced setups involve neural networks.
- Testing Tips: Start with manual controls, then autonomous modes—expect iterations for optimal performance.
- Upgrades: Add more sensors or cameras for enhanced functionality, but prioritize safety and compatibility.
Why This Project?
This DIY endeavor fosters skills in coding and hardware integration. For beginners, kits simplify the process, reducing frustration from sourcing parts individually. Community reviews highlight that these projects are rewarding but may require basic soldering or debugging knowledge.
Comparison of Popular Kits
Here’s an updated comparison based on current availability and features (as of September 2025). Prices are approximate and may vary; check retailers for deals.
| Kit (Click to Buy) | Key Features | Notes / Price (approx.) |
|---|---|---|
| OSOYOO Model 3 Robot Car Starter Kit | Arduino-based with chassis, motor shield, ultrasonic sensor, line trackers, IR remote, and Bluetooth control. Supports obstacle avoidance and multi-mode operation. | Beginner-friendly with detailed tutorials; ~$50. |
| Freenove Robot Ant Kit | Six-legged design with swappable heads (ultrasonic sensor or dot-matrix LED for expressions), IR remote, Bluetooth app control, and obstacle avoidance. | Creative and programmable; ~$62. |
| XiaoR Geek Donkey Car Kit | Raspberry Pi 4B-based with 720p camera, TensorFlow AI for neural network training, line-following sensors, ultrasonic avoidance, and stainless-steel chassis. | Advanced AI focus, includes Pi; ~$229. |
These kits remain top choices among 2025 reviews for DIY autonomous RC cars, emphasizing ease of use and educational value.
Building a self-driving remote-control (RC) car at home is a fun STEM project that teaches robotics, electronics, and programming. An autonomous RC car can navigate on its own using sensors (like sonar or line trackers) and code. In this tutorial, we’ll guide you through making your own DIY autonomous RC car. You’ll learn what parts are needed, how to assemble the car, how to write simple “AI” code to avoid obstacles, and tips for testing. We’ll also compare three popular kits – OSOYOO, Freenove, and XiaoR Geek – that can help beginners get started. Following step-by-step instructions (and even YouTube tutorials), you’ll have your own robot car driving itself in no time.
Materials and Recommended Kits
Basic parts: To build a self-driving RC car, you need a few essentials:
- Chassis & motors: A 2WD or 4WD car frame, wheels, and DC motors. You can use an old RC car chassis or a kit’s plastic frame. (Tip: a larger 1:10 scale RC car has more room for parts than a tiny toy car.)
- Controller board: An Arduino board (e.g., Arduino Uno) or a Raspberry Pi. This is the “brain” that reads sensors and drives the motors.
- Motor driver/shield: Controls the speed and direction of the motors from the board’s signals (for Arduino kits, this often comes as a motor shield).
- Sensors: At minimum, an ultrasonic (sonar) sensor for obstacle detection. Many kits also include infrared line-following sensors (to stay on track) or cameras.
- Power: Battery pack (e.g., a holder for rechargeable 18650 Li-ion cells) and a charger. Tutorials recommend using 18650 batteries for smooth operation.
- Tools & extras: Wires, breadboard or soldering tools, screwdriver, and a computer with a USB cable for programming the board.
A great way to gather most needed parts is to buy a DIY kit. Below is a comparison of three popular Amazon-affiliate kits that make building easier. Each comes with its own parts, tutorials, and sample code. (Click the product names to see details on Amazon and buy them with our affiliate tag.) These kits are highly rated in 2025 reviews for their educational value and reliability.
| Kit (Click to buy) | Key Features | Notes / Price (approx.) |
|---|---|---|
| OSOYOO Model 3 Robot Car Starter Kit | Complete Arduino-based kit for beginners. Includes a clear chassis, motor driver shield, ultrasonic sensor, line trackers, IR remote, and Bluetooth app control. Step-by-step tutorials guide you from basic chassis to multi-mode robot car, including obstacle avoidance. | Beginner-friendly with hands-on assembly focus; ~$50 (updated 2025 pricing). |
| Freenove Robot Ant Kit | Unique six-legged “ant” robot design. Comes with two swappable heads: one ultrasonic sensor and one dot-matrix LED display for expressions. Also has IR remote control and phone-app (Bluetooth) control. A fun way to learn programming with visual feedback. | Creative build, compatible with Arduino IDE; ~$62 (current as of 2025). |
| XiaoR Geek Donkey Car Kit | Advanced Raspberry Pi-based self-driving kit. Uses a Raspberry Pi 4B (included) with camera and TensorFlow AI for deep learning. Includes line-follow sensors, ultrasonic sensor, servos, and a stainless-steel chassis. Teaches neural-net training (via the open-source Donkey Car project) for lane-following. | Deep-learning focus, open-source; ~$229 (includes Pi, updated 2025). |
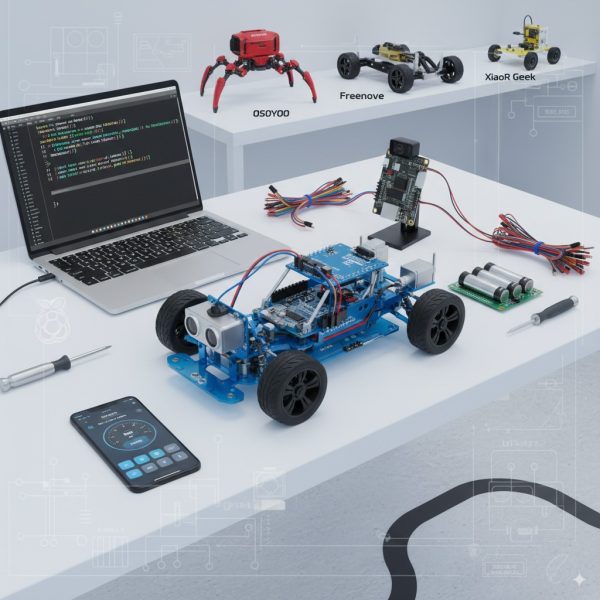
Figure: An example robot car chassis with Arduino board and motors – similar to the OSOYOO DIY kit hardware.
OSOYOO Model 3 (Complete Kit)
This kit is designed for beginners. It includes a plastic chassis, Arduino-compatible board (Arduino Uno form-factor), motor shield, ultrasonic sensor, line-tracking sensor array, IR remote, and Bluetooth module. OSOYOO provides step-by-step lessons that start with a simple car and gradually add features (like obstacle avoidance and phone control). All wiring points are labeled, making assembly easy. For example, tutorials show how the car will “go forward 2 sec, then back, then turn left/right” during a test run. It’s a complete starter pack – just add the batteries (18650 cells as recommended) and follow their online guide. Recent reviews praise its educational value for kids and adults, though some note the need for careful motor speed adjustments.
Figure: The Freenove Robot Ant kit is a 6-legged “ant” robot. It has an ultrasonic sensor and a dot-matrix face, making it a unique build (and great for learning programming with fun visual feedback).
Freenove Robot Ant (Creative Build)
Unlike a regular car, this Freenove kit builds a hexapod “ant” robot! It comes with two heads: one ultrasonic rangefinder and one 8×8 dot-matrix display for showing expressions (like happy/sad faces). The ant has 6 servo-driven legs, and you can control it via an IR remote or smartphone app (Bluetooth). Its features include obstacle avoidance and colorful lights. The novelty of this kit is its form factor – kids love programming its face and watching it crawl. The required parts (servos, frame pieces, microcontroller) are all included; you only need to supply batteries. This kit is great if you want a unique build that also teaches sensor and motor control. 2025 reviews highlight its clever design driven by just three motors, with positive feedback on the detailed tutorials and code support.
XiaoR Geek Donkey Car (Advanced AI Kit)
This is a cutting-edge kit aimed at older kids or hobbyists interested in AI. It provides a 4WD car chassis and uses a Raspberry Pi 4B (now included) as the brain, with a 720p camera. You write Python code and use the TensorFlow library to train the car’s neural network. Essentially, you “drive” the car manually to record images and steering, then train that data into a model. The car then uses the camera and model to drive itself following a track. The kit also has line sensors and an ultrasonic sensor, so it can follow lines and avoid collisions. This is an open-source Donkey Car project, and even though it costs more, it teaches machine learning on a small scale (see Donkey Car’s own tutorial). It’s perfect if you want an advanced DIY project with real self-driving tech. Updated reviews in 2025 commend its AI capabilities and Raspberry Pi integration for accessible deep learning.
Building the Car
Once you have your parts, it’s time to assemble the robot car. Here’s an overview of the steps:
- Chassis Assembly: Attach the motors and wheels to the car chassis. Most kits include screws and motor mounts. For example, OSOYOO’s plastic chassis has slots to slide in the two DC gear motors and fix them with screws. Make sure the motors are mounted securely and wheels spin freely. If you’re not using a kit, any RC car frame can work – just bolt on the motors and servos (for steering). Remember, a standard 1:10 scale chassis has plenty of room for wiring and batteries.
- Mount the Controller and Sensors: Next, fix the microcontroller board (Arduino or Pi) onto the chassis using standoffs or screws. Then attach the sensors in their places: usually the ultrasonic sensor goes at the front (so it can “see” obstacles), and line sensors mount on the bottom facing the ground. For example, in the Freenove ant kit, the body has two head slots: one head holds the ultrasonic sensor and another holds the dot-matrix display. (You can choose which goes front/back.) Attach any IR receivers or Bluetooth modules too – these kits often have small mounts or adhesive pads for sensors. Ensure wires won’t tangle with wheels or servos.
- Wiring and Power: Now connect everything. Typical wiring includes: motor A’s two wires to the motor driver outputs, motor B’s wires similarly, ultrasonic VCC/GND and trigger/echo pins to digital pins on the board, line sensor signals to analog/digital pins, etc. For example, an Arduino Uno powers the sensors with 5V/GND and reads ultrasonic ping/time on two digital pins. Use female-male jumpers or terminal blocks as needed. Plug the battery pack into the motor driver shield (or connect it to the Pi’s power input). OSOYOO’s motor shield often has a top switch for turning the car on/off. Double-check connections against your kit’s diagram.
- Check Everything: Before programming, test that each part is powered correctly. Turn on the battery switch (if any) and the power LED should light. Spin the wheels by hand to ensure motors are free. Many tutorials recommend a final check: with USB connected, upload a test sketch that makes the car run through a short sequence (forward/back/left/right). OSOYOO’s Lesson 1 example has the car move and turn on its own to confirm wiring.
Programming the Car
With the car built, the next step is to write code that makes it drive itself. The approach depends on your board:
- Arduino (C/C++ code): Most kits like OSOYOO and Freenove use Arduino boards. You’ll write sketches in the Arduino IDE. The logic is simple: in a loop, read sensor values, then decide how to drive motors. For instance, you might do:
- Read the ultrasonic distance. If it’s too close to an object, stop or turn.
- Otherwise, drive straight or follow a line (based on line sensor input).
One DIY example uses five ultrasonic sensors with an Arduino to measure distance in all directions and steer accordingly. The Arduino’s servo library controls steering and an ESC (speed controller) for throttle. If you’re using an OSOYOO kit, they provide sample code for modes like “Obstacle Avoidance” and “Line Tracking”. You can start with their code (usually just upload via USB) and then tweak it. For kids, programming is like: “If front sensor < 20cm, then turn right. Else go forward.” It’s very much like giving the car simple instructions. No advanced math is needed at first—just basic if-then logic and motor control commands.
- Raspberry Pi (Python & AI): If you have the XiaoR Geek (Donkey Car) kit, coding is in Python on Linux. Here you often use the open-source Donkey Car framework. Initially, you manually drive the car (with a controller or phone app) so the Pi’s camera records video plus your steering inputs. Then you train a neural network on that data. After training, you load the model onto the Pi. In operation, the Pi’s camera feeds video into the neural net, which outputs steering/throttle commands—making the car drive itself. In short: the car learns by example. As one maker puts it, “Autonomous driving is achieved by recording images and your inputs… then it uses TensorFlow to learn from you”. This is more advanced – but the kit includes code and instructions to simplify it. If AI is too much now, you can still use the Raspberry Pi to run simple sensor code just like on Arduino (read the ultrasonic sensor in Python and control motors). The kit’s tutorials guide you step-by-step through installing Raspbian, setting up the camera, and running the AI code.
- Controls and Apps: Many kits let you control/train the car via a smartphone app or IR remote. For example, the Freenove kit includes an IR remote and also lets you use an Android/iOS app to drive or initiate obstacle-avoidance mode. The OSOYOO kit even has a mobile app with a virtual steering wheel for manual driving. These options are handy for testing or for teaching the car during the training phase.
In all cases, step-by-step code examples are provided by the kit makers. OSOYOO’s tutorials give fully-commented Arduino code for each lesson. Freenove offers downloadable tutorials and example code on their site. For deep learning, the Donkey Car documentation walks through data collection and training. Lean on these resources—copying and running example code is a great start for beginners.
Testing Your Car
Testing is a critical step. You should:
- Power on and listen: With batteries in, switch on the car. The motors may briefly turn or hum. If nothing happens, check power and switches.
- Obstacle Test: Stand in front of the car and see if it stops or turns away. Use a box or obstacle. If the car should avoid obstacles but instead crashes, check your sensor wiring or code thresholds.
- Line Tracking Test: If your kit has line-following mode, draw a track on the floor with black tape and watch if the car follows it. Adjust sensor heights or code values if it strays.
- Manual Control: Try the IR remote or app. Moving the car manually helps confirm steering and throttle work.
- Battery Life: Run it a while to ensure the batteries last and don’t overheat. Rechargeable 18650 cells (or a LiPo battery) are recommended for consistent power.
- Iteration: If something fails, revise wiring or code. It’s normal for the first run to need tuning. Debug one part at a time – for example, test that the ultrasonic gives a sensible distance reading before running the motors.
As a guiding example, the OSOYOO lesson suggests this final test: after uploading the sketch, the car will autonomously move forward for 2 seconds, back 2 seconds, left 2 seconds, then right 2 seconds, then stop. If your car behaves like that, it’s wired and coded correctly. Otherwise, revisit your connections. Once basic functions work, you can deploy your code and watch the car explore on its own! Recent user experiences emphasize incremental testing to avoid common pitfalls like uneven motor speeds.
Advanced Upgrades and Mods
Once the basics are working, you can add cool features:
- 360° Sensing: Add more ultrasonic or infrared sensors around the car for better obstacle awareness. For instance, attach sensors on a servo or two in front and at sides. This helps the car detect obstacles from any direction.
- Camera and Vision: Even without full AI, you can mount a small USB camera and do simple object recognition or even line-drawing by processing images on the Raspberry Pi. Some hobbyists add a pan-tilt camera for live video streaming.
- Remote Overrides: For advanced control, one maker suggested wiring the original RC car remote receiver to the microcontroller via an Arduino. This lets you easily switch between manual remote control and autonomous mode.
- 3D Printed Parts: Design 3D-printed holders or brackets for better sensor placement or a custom look. For example, printing a mount for the ultrasonic sensor can improve its range.
- Lights and Sound: Add LEDs or buzzers for effect. A headlight LED that turns on when moving or a buzzer sound on obstacle detection makes the project more fun.
- Machine Learning: If you have the XiaoR Geek kit, try more advanced training: record yourself driving under different conditions (indoor/outdoor, day/night) and see if the neural net adapts. You can even train for recognizing stop signs or colors on the track using the camera.
Every extra mod will deepen your learning. For ideas, see online forums and videos. For instance, the Donkey Car community shares advanced projects, and OSOYOO’s forum has many user projects. Start simple and keep experimenting!
Get Started Today!
Now you have a plan to create your DIY autonomous RC car. Gather your materials (or purchase one of the kits above with the affiliate links), follow the assembly steps, and start programming. Remember to go slow: double-check wiring, use the example code from OSOYOO/Freenove, and test incrementally. There are also many helpful tutorials online and videos that walk through each lesson. For example, OSOYOO’s website has Lesson 1: Basic Assembly showing the first build steps. You can also find Freenove kit tutorials (search “DIY Robot Ant Kit Part 1” on YouTube) and full Donkey Car guides for the AI part.
Building an autonomous car is challenging but rewarding. By the end, you’ll not only have a cool robot vehicle but also new skills in electronics and coding. So grab your screwdriver and let’s start building that smart car!
Affiliate Disclosure: Some product links above are Amazon affiliate links (with ?tag=rcblogs-20). If you buy through those links, we earn a small commission at no extra cost to you. We only recommend products we trust. As an Amazon Associate, we earn from qualifying purchases.
Sources: We referenced DIY guides and product pages to ensure accuracy. For more detailed instructions, check the official tutorials (e.g., OSOYOO lesson) and kit manuals. Happy building!
Key Citations
- Best RC Car Kits 2025: Expert-Tested Builds for Every Skill Level
- Autonomous RC Car : 7 Steps – Instructables
- Autonomous cars for the rest of us
- How to make a self-driving car model – part 1 – Tooploox
- The (almost) COMPLETE Guide to Electric RC Cars – Instructables
- The 8 Best Robot Kits of 2025 | Tested & Rated – Tech Gear Lab
- How should I start to build an autonomous RC car? I have a physics … – Quora
- Freenove Robot Ant Kit (Compatible with Arduino IDE), Dot Matrix …
- Freenove Robot Ant Kit (Compatible with Arduino IDE), Dot Matrix …
- Arduino Ant Hexapod Robot | Easy build | Dot Matrix Expressions – YouTube
- OSOYOO Model 3 Robot Car DIY Starter Kit for Arduino,Educational …
- Arduino Smart Robot Car kit model 3 OSOYOO
- Osoyoo Robot Car – Unboxing & First Impressions – YouTube
- Osoyoo Model-3 V2.0 Robot Car Lesson 1
- Need to slow down OSOYOO Model-3 V2.0 Robot car kit motors – Reddit
- OSOYOO Model-3 Robot Learning Kit Lesson1 Basic … – YouTube
- Osoyoo Model-3 V2.0 Robot Learning Kit Model#2020001700
- Getting Robot to Drive Straight with Basic Kit – Arduino Forum
- AI Racing Robot Kit Donkey Car Starter Kit Powered by Jetson Nano …
- XiaoR Geek XR-F1 Raspberry Pi deep learning Programmable Self …
- Build Your Own Self-Driving Car with the 2025 Donkey Car Kit – YouTube
- XiaoR Geek-Robot Edu | Shenzhen – Facebook
- Unleash Your Inner Engineer with XiaoR Geek Donkey Car
- Freenove Robot Ant Kit (Compatible with Arduino IDE), Dot Matrix Expre – Summary
- XiaoR Geek XR-F1 Raspberry Pi deep learning Programmable Self Driving Smart Robot Car – Summary