Having your RC car suddenly speed off uncontrolled can be terrifying. One key safety step that many RC hobbyists overlook is the mounting orientation of the car’s on/off switch. A maintenance expert advises: “Make sure you mount it so that the on position is facing the front end. This way when it takes a hard front hit the switch will stay on instead of turning off.” In other words, install the switch so “ON” points toward the car’s front. If you crash or flip forward, that impact will push the switch further ON rather than accidentally toggling it off. By securing the switch this way, you greatly reduce the chance of a runaway when the car takes a hit.
In this article, we’ll explain what causes RC runaways, why switch orientation matters so much, and how to mount and protect your on/off switch. We’ll share step-by-step tips, tools you need, and even some product suggestions (like waterproof switch covers and cable ties) to keep your next drive safe and worry-free. Let’s drive in with confidence! 🏎️
What Is an RC Car Runaway and Why Is It Dangerous?
A runaway RC car is one that keeps moving out of control, often at full throttle, because something has gone wrong. This can happen if the radio signal cuts out, the battery dies, or the on/off switch accidentally shuts off. Nitro (gas) cars are especially vulnerable: if the switch cuts power mid-run, the throttle servo can freeze and the engine stays wide open, making the car rocket away with no way to brake. Electric cars generally stop when power is off, but they can still veer wildly if steering fails.
Runaways aren’t just scary – they’re dangerous. Hobbyists report crashes into walls, fences, or even pets and bystanders. Some have lost expensive car bodies or damaged property (and no one wants a flying RC in a crowd). That’s why the RC community stresses testing failsafes and controls before every run. As a used-Nitro-RC checklist advises: “Turn on the transmitter and receiver, make sure steering, throttle, and brakes are active. With the electronics turned on, roll the vehicle by hand on the ground and look for any friction in the drivetrain. Hit the brakes to make sure they stop the vehicle from rolling.” These simple checks help catch problems early. Remember: always test your car off the ground before blasting around. ⚠️
Why Does Switch Orientation Matter?
Why point the switch forward? The reason is simple physics. In a head-on crash, parts of the car (or ground) hit the switch knob. If “ON” is pointed rearward, a forward impact will push it OFF, cutting power. In a nitro car, that means you lose radio and ignition at full throttle – a recipe for runaway. But if “ON” faces forward, the same blow presses the switch deeper into ON, so the car keeps its power.
In short, a front-facing switch is self-reinforcing in crashes. By contrast, a rear-facing switch can turn off with any front hit.
This tip is even more critical on nitro/gas cars. Electric cars often have an electronic failsafe that stops the motor if signal is lost, but if a battery or switch fails, the electronics have no power to do that. One RC expert bluntly warns that if the receiver loses power, the radio failsafe “will do diddly squat,” so you need a mechanical backup. In practice, that means using a strong throttle return spring or rubber band on the carburetor. As one veteran notes: “For complete battery failure or otherwise, I would use either some rubber bands or a return spring on your carburetor.” RC Talk forum. With the return spring, if power dies, the spring snaps the throttle back to idle.
Key point: Face “ON” forward so a crash won’t shut you off, and double up your safety (radio failsafe and a throttle return spring) to prevent runaways. 🔧
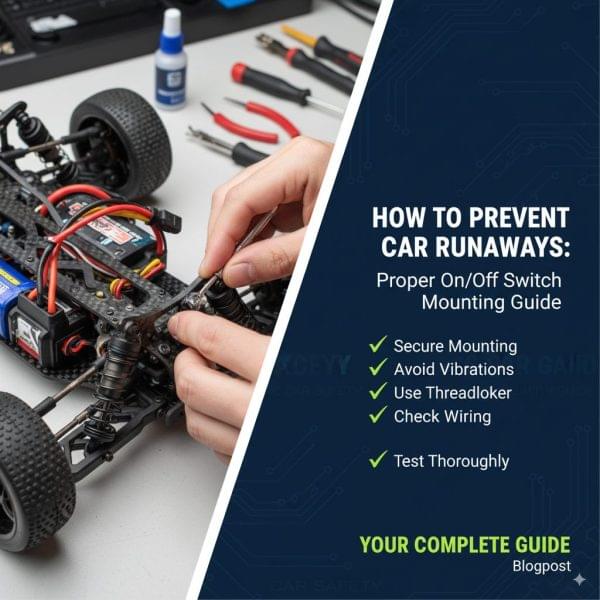
How to Mount Your RC Car’s On/Off Switch Properly
Mounting the switch correctly is quick work. Follow these steps:
- Choose the Mount Location: Identify where the chassis or battery box has a hole or bracket for the switch. It should be accessible but not in the way of moving parts or fuel lines. Often there’s a small U-bracket that clamps around the switch’s threaded shaft.
- Set the Orientation: Before tightening anything, confirm that the “ON” position on the switch label points toward the car’s front end. (You can mark it with an arrow or a bit of tape.)
- Fasten the Switch: Use the switch’s mounting bracket (or the provided hex nut on a toggle switch) to secure it. Drill or use existing holes as needed. Tighten screws firmly so the switch won’t rotate or vibrate loose. A drop of threadlocker on the screws can help in high-vibration models.
- Route and Secure the Wires: Plug the switch harness into your battery lead or ESC. Bundle the wires and run them neatly along the chassis. Use VELCRO ONE-WRAP cable ties (100-pack) or zip ties to clamp the wires down. This keeps them from snagging on chassis edges or interfering with steering.
- Double-Check the Installation: Toggle the switch on and off several times to ensure it stays in place. Confirm that “ON” remains forward after tightening. Make sure the car powers up when ON and shuts down when OFF (with the transmitter and car turned on in the correct order).
By doing this, you ensure that any front impact pushes the switch into the ON position (not off). One final tip: keep the switch a little away from hot parts or fuel, and don’t let antenna leads or fuel lines rub against it. A neat, secure installation not only prevents runaways, it also makes your car more durable. 🚀
What Tools and Materials Will You Need?
Gather these items first:
- Toggle/Pushbutton Switch: A sturdy RC-grade on/off switch (10–20A rating). Many come with mounting nuts and a small metal bracket.
- Mounting Hardware: The switch usually includes a bracket or nut/washer set. You may need small screws (often M3 or similar) and a hex driver.
- Hex Drivers or Screwdrivers: To tighten the mounting screws and switch nut.
- Drill (if needed): If you have to make a new hole in the chassis or battery tray.
- Velcro Straps/Zip Ties: VELCRO Brand ONE-WRAP cable ties (or similar) are great for bundling wires safely. A 100-pack means you can secure all your wiring and use extras elsewhere.
- Switch Boot Covers: Silicone rubber caps to cover the switch knob. These seal out dirt and water. (See example silicone switch covers – they come in packs of 5–20.)
- Electrical Tape/Plasti-Dip: To insulate and waterproof connections after mounting.
- Optional – Kill Switch: (Advanced) For serious racers, a remote (wireless) kill switch lets you cut the engine from the transmitter in an emergency.
- Optional – Failsafe Gear: Spare throttle return spring or rubber band for nitro, as mentioned above.
With these on hand, you’ll mount your switch quickly and make the whole setup more secure. It only takes a few dollars of hardware and a few minutes of work, but it pays off in safety. 🛠️
How to Waterproof and Protect the On/Off Switch
Since RC cars often get wet or muddy, protect the switch:
- Wrap Wiring: After hooking up the switch, wrap any exposed solder joints or metal terminals tightly with electrical tape or a layer of Plasti-Dip. This prevents shorts.
- Use a Rubber Boot: Slip a silicone boot over the switch knob. These stretch to fit and create a seal. They keep water out and debris from jiggling the switch. (For instance, silicon cover kits for toggle switches are inexpensive and effective.)
- Seal Holes: If you had to drill a hole, use a dab of silicone sealant around it to keep moisture out of the chassis.
- Enclosure or Box: If possible, install the switch inside a small plastic switchbox or sealed compartment. This adds another layer of protection.
- Post-Run Care: After a muddy or wet run, dry off the switch area. You can spray a little electrical contact cleaner on it.
The goal is to keep water (and any ionic contaminants) away from metal parts. With a boot cover and some sealant, even a puddle won’t knock out your switch. 💦
Pre-Run Safety Checklist: Preventing Runaways Every Time
Before every drive, do a quick safety scan. Veteran RCers follow the same routine:
- Switch ON: Confirm the on/off switch is set to ON. (It sounds obvious, but it’s easy to forget in the garage.)
- Power Sequence: Turn on the transmitter (TX) first, then the car. When done, shut the car off before the TX. This order prevents spurious signals or unexpected starts.
- Battery Levels: Check that the transmitter, receiver, and batteries are fully charged. Low power can mimic a cutoff.
- Antenna Check: Ensure the antenna or wiring is properly positioned for clear reception.
- Brakes and Steering Test: Lift the car (so wheels spin freely) and apply throttle. Then apply the brake stick: the wheels should stop immediately. Wiggle the steering stick to ensure the wheels turn fully left and right. This verifies control surfaces work.
- Throttle Test: With the car still lifted, tap the throttle. The wheels should spin. Release – the throttle servo should snap back to idle. On a nitro car, the engine should settle to a steady idle speed. (If it stays open or sputters, adjust the throttle trim or idle screw.)
- Failsafe Test: If your radio has a programmable failsafe, test it by turning off the transmitter briefly while the car is running. The engine or motor should immediately slow or stop (as per your settings.)
- Final Inspection: Do a quick walk-around. Tighten any loose screws, make sure the switch didn’t shift, and that all wires are still secure.
A good rule of thumb from RC experts: “With the electronics turned on, roll the vehicle by hand and hit the brakes to make sure they stop the vehicle.” It only takes a few seconds. If any test fails (e.g. throttle sticks open or brakes don’t work), stop and fix it before running. Always give your car an initial test in an open area to verify these safety systems. ✅
How to Prevent Runaways: Gear and Upgrades
Beyond mounting, some accessories can further reduce risk:
- Waterproof Switch Kits: Some switches come in sealed aluminum housings. These weatherproof on/off switch kits are ideal (if you can find one for RC, otherwise a DIY plastic box works).
- Silicone Switch Covers: As mentioned above, silicone caps over the switch (and any exposed toggles) add a tight seal. (For example, silicone toggle switch covers are cheap and cover standard 12mm switches.)
- Velcro Cable Ties: Keeping wiring neat prevents accidental pulls. Velcro straps or zip ties bundle the receiver, servo, and battery wires to the chassis, preventing snags. It’s a low-cost fix that goes a long way.
- Throttle Return Spring: On nitro cars, a strong throttle return spring (or rubber band) on the carburetor is a must. This mechanical spring forces the throttle closed if power is lost.
- Remote Kill Switch: For high-end nitro setups, a wireless kill switch on the engine lets you cut ignition from your transmitter if things go wrong. This is more advanced, but it provides instant shutoff.
- Safety ESC (electric): Many modern brushless ESCs have built-in safety features (soft start or auto-brake on signal loss). Using one of these means the motor won’t surge if a throttle signal sticks.
By combining good habits and gear, you virtually eliminate runaways. Many racers use both the “front-facing switch” trick and a return spring. These redundancies mean one failure won’t spell disaster. 🛡️
Conclusion
Runaways are scary, but preventable with the right habits. In summary:
- Mount the Switch Correctly: Always point “ON” toward the front of the car. It’s a tiny detail that stops front hits from flipping you off.
- Protect the Switch: Use waterproof boots, tape, or enclosures to keep moisture out. A clean, dry switch won’t fail unexpectedly.
- Do Pre-Run Checks: Each time, test throttle, brakes, and failsafe before letting it drive. Catching a problem early can save a crash.
- Use Mechanical Backups: Nitro users, always have that throttle return spring or rubber band. Electrics should use a radio failsafe or safe-mode ESC.
- Secure Everything: Tight wires, charged batteries, a good antenna, and running in a safe open area away from people and obstacles. Wear safety glasses and keep tools ready.
Following these tips will keep your RC fun and safe. Always share safety advice with fellow racers – a community that works together runs better. Enjoy your next drive, and happy (and safe) bashing! 🎉