RC cars, boats, and crawlers can take you into mud, rain, or shallow water – but servos fail fast if they get wet 💧. Waterproofing RC servos is crucial for reliability. One popular hack is the “balloon method”, where you slip a latex balloon over the servo and seal it to trap air. In this guide, we explain how the balloon method works (and where it fails), plus other practical tips and products to protect your servo.
Why Waterproofing Matters for Your RC Setup 🛡️
Why is this important? Many hobbyists underestimate a servo’s vulnerability. Unlike a brushed motor, a servo contains a delicate circuit board and gears. RCCarStars points out that beginners often think “it’s just like a small motor” – until water lands inside. “Many people believe servos don’t need protection… until you realize there is a circuit board,” and by then it’s too late. As RCCarStars warns, “it’s hard to get water out once it has entered the servo box”. In other words, a soaked servo can short out or corrode and leave you stranded.
Even thick rubber seals on a stock servo are only water-resistant, not fully waterproof. Society of Robots notes servos have only “near water-tight seals,” and the output shaft is the weak spot. It’s “always the most difficult part” to seal when waterproofing. So it pays to add extra protection before you go puddle-jumping 🚤.
How Does the Balloon Method Work? 🎈
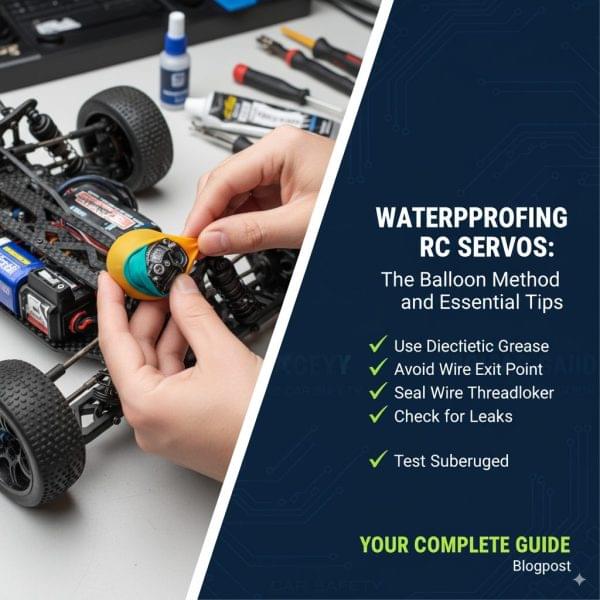
The balloon method is simple and cheap. You wrap the servo (or other electronics) in a latex balloon and seal it around the wires to keep moisture out. Here’s a basic rundown of the balloon trick:
- Gather supplies 🚀: You need a latex balloon (thick, 12″ party-style works best, like the QRabbit 100-Pack) and a way to seal it, like zip ties or tape. (For example, QRabbit 100-Pack 12″ Latex Balloons makes a hundred thick balloons you can use.)
- Attach servo horn and wires 🔧: If not already installed, attach the servo horn and plug in the servo’s connectors. Some people remove the horn and re-glue it later, but many just leave it on and cut a small slit for the output shaft. In practice, you can often leave the horn on and push the servo partly through the balloon, letting the shaft poke out.
- Insert servo into balloon 📦: Stretch the balloon opening and drop the servo (with wires) inside. As one RC guide explains, “place the ESC or receiver inside a balloon, ensuring all wire connections come out through the opening” . Do the same with your servo. Holding the balloon open, guide the servo so that its output shaft (or servo arm) is also inside or poking through a small hole.
- Seal the balloon opening 🔒: Slide the wires out of the balloon’s mouth. Then roll the balloon neck down tightly around the wires. Use one or two zip ties or electrical tape to cinch it closed. EuroRC notes you should “seal the balloon mouth tightly with electrical tape or zip ties” to create an air pocket. This trapped air stops water from reaching the electronics inside, even if the servo gets splashed. (For extra grip, some add a dab of silicone sealant or grease in the neck before tying .)
- Double up for safety (optional) 🛡️: For very wet use, consider a double-layer balloon. After one balloon is secured, put on a second balloon and seal it again. Many RC boaters swear by this. One user reports: “I use two balloons… It works wonders when I’m… in salt water” . Another enthused, “The double balloon method works great for my sailboat, power boat, and rc surfer.”
These steps essentially wrap the servo in waterproof latex. The goal is to keep water out by trapping air around the servo and sealing any holes. It’s quick, low-cost, and you can do it trackside in a minute or two ⏱️.
Step-by-Step: Balloon Method Example 📋
- Step 1: Prepare the servo. Attach the servo horn and plug in the servo to its extension cable. Push any wires through the horn if needed, leaving them clear of gears.
- Step 2: Stretch the balloon. Use a thick 12″ latex balloon. Stretch the neck wide with your fingers (or have a helper hold it open).
- Step 3: Insert the servo. While holding the balloon open, drop the servo inside. The servo output shaft should either be inside or slightly poking out. Make sure the wires exit through the balloon’s mouth.
- Step 4: Roll and seal the neck. Fold or roll down the balloon neck in layers around the wires (like folding a cuff). You want at least a couple layers of latex.
- Step 5: Apply sealant (optional). Squirt a small amount of silicone or dielectric grease into the folded neck of the balloon. This fills any tiny gaps around the wires.
- Step 6: Tie it up. Cinch a zip tie or wrap heavy-duty electrical tape tightly around the folded balloon neck. Trim off excess tie. Check that you cannot push any more air out through the seal. One hobbyist notes: “When you’re done, you shouldn’t be able to squeeze out the remaining air” . If air still escapes, re-wrap more tightly.
- Step 7: Optional double-wrapping. For extra security, repeat with a second balloon. Just cover your first wrapped servo with another balloon and seal again. This double layer can add peace of mind in water.
See the image below: a servo inside two balloons, sealed with zip ties. “I use two balloons… It works wonders when I’m… in salt water.”
What you’ll need: In addition to the servo and balloon, common supplies are zip ties and tape. For example, a pack of ANOSON Zip Ties (400-pack) gives you hundreds of ties to use. Good electrical tape like 3M Scotch Super 88 is handy for extra sealing. And don’t forget servo grease: after any wet run, re-lubricate gears with a quality lube (e.g. Maxima Waterproof Grease).
Does the Balloon Method Make the Servo Truly Waterproof? ⚠️
Not entirely. The balloon method can protect against splashes, rain, or puddles, but it has limits. Latex balloons are not unbreakable – they can tear or develop pinholes over time. The output shaft of the servo is also a challenge: if the balloon is cut to let the shaft spin, water could still enter around that cut. As one Instructables guide bluntly puts it, the balloon trick “may work for snow-proofing, but definitely not water”. In other words, don’t fully submerge it and assume it’s safe.
Real-world users confirm this caution. One builder wrapped a receiver in a balloon, and it “worked fine… for a couple of times in calm water,” but failed in salt water. Likewise, RCtalk experts warn that a latex balloon can tear and is only a temporary shield. In fact, RCtalk.com notes that while you can balloon-wrap a servo, “a balloon is easily ripped or torn” on a servo that’s exposed to the elements.
Bottom line: The balloon method keeps out splashes and brief dips, but it’s not a guarantee against deep or prolonged immersion. If your servo is going to be underwater for more than a few seconds (say, in deep water or on a submersible boat), rely on a purpose-built waterproof servo or extra sealing measures.
What Other Waterproofing Methods Are There? 🔧
Fortunately, ballooning is just one trick. Here are other common methods used by RC hobbyists:
- Conformal Coating / Silicone Spray: Instead of a physical barrier, you can make the servo electronics themselves water-resistant. A conformal coating (spray-on acrylic or silicone) seals the circuit board. One RC user says, “I use silicone conformal coating on all my electronics… It’s applied directly to the boards, so it’s truly waterproof”. For example, Techspray 2103 Acrylic Coating is a popular aerosol. You’d open the servo (remove cover), spray the PCB and connectors, let it dry, then reassemble. This protects against humidity and splashes. It’s more work than a balloon, but more durable.
- Waterproof Grease and O-Rings: Another method is to seal the moving parts. EuroRC recommends “apply waterproof grease to servo gears beneath the top case to create a moisture barrier,” and even adding a greased O-ring around the output shaft before putting on the servo horn will resist washout.
- Tape and Sealant: Simple electrical or silicone tape can help. Wrap servo cases, connectors, and any openings with tape to keep water out. Some builders cut small latex or silicone disks to seal the spline on the servo arm. Others even pour liquid silicone (like Goop) around holes before tying. For example, a step-by-step guide for receivers fills the balloon neck with silicone glue, then zip-ties it . You can do the same on a servo. The idea is to seal wire pass-throughs completely.
- Plasti Dip / Rubber Paint: Dipping the servo in rubberized paint (Plasti Dip) can coat the exterior in a plastic layer. It’s messy, and the servo horn shaft must be removed first. It does give a waterproof shell. One RC blog notes that dipped servos “don’t look as cool” but work well. This method covers everything but is essentially permanent (you’d have to scrape the paint off to repair the servo later).
- Oil-Fill (Advanced): For extreme cases (like RC submarines), some modders fill the entire servo with mineral oil under vacuum, then seal it. This is very advanced: one experienced modeller “filled the servo with oil, submerged it in oil under high vacuum, then glued a rubber membrane over the fill hole” to create a pressure-compensated unit. That way, water never contacts air inside the servo, making it truly waterproof. However, this is time-consuming and typically overkill for casual use.
| Method | How It Works | Pros | Cons |
|---|---|---|---|
| Balloon Wrap | Servo in a latex balloon, sealed around wires. | Cheap, quick, easy DIY. Traps air. | Can tear or leak; not for deep submersion. |
| Silicone/Coating | Spray or brush the PCB/board with waterproof coating. | Truly seals electronics & board. | Requires disassembly; fixes fluid. |
| Grease & O-Ring | Lubricate gears; add a greased O-ring on the output shaft. | Protects internal gears; durable. | Needs servo open; messy to apply. |
| Tape / PlastiDip | Wrap case or dip in rubberized paint/tape. | Covers all seams; common items. | Bulky; permanent; may interfere with fit. |
| Oil Immersion | Fill the servo with oil (vacuum-assisted). | Deep waterproof, pressure-proof. | Very complex; not reversible easily. |
Many RC enthusiasts combine methods. For example, you might use the balloon wrap and grease the gears. Or spray on conformal coating and wrap in tape. The key is redundancy – keep water from any entry point 💦.
Maintenance After Wet Runs 🧹
No waterproofing is perfect, so post-run care is vital. As soon as you finish running in wet conditions, follow a maintenance routine:
- Clean off debris: Remove mud and sand from the servo exterior. Use a damp cloth or brush.
- Blow out moisture: Power down and remove any batteries. Aim compressed air into vents and the area around the seal to blow out water droplets. Even a gentle spray can help shake out hidden moisture. EuroRC’s guide stresses: “Remove loose dirt, mud, and debris before bringing the vehicle indoors. Use compressed air… to clear water from tight spaces”.
- Dry completely: Leave the servo in a warm, dry area for a few hours (2–3 hours is good). Do NOT store or run it until it’s bone dry. Any trapped water can corrode or short the circuitry. EuroRC notes to “allow 2–3 hours for complete drying… as trapped moisture can cause short circuits even in waterproof components”.
- Re-lubricate: Once dry, check the servo’s gears and moving parts. Apply fresh waterproof grease to any parts you sealed earlier. Also, spray or wipe metal parts with a light oil or corrosion inhibitor. For example, WD-40 Specialist or Tri-Flow around the shaft and bearings prevents rust. The EuroRC checklist says after drying, “reapply bearing oil… and check that all waterproof seals remain intact”.
- Test it out: Power up your RC with the wheels/propeller off and verify the servo moves smoothly. If it “stutters” or hesitates, there might still be moisture or seal damage.
Regular maintenance extends servo life. Think of waterproofing as prep and cleanup: seal before the run, then wash and dry after. This way, even with the balloon or tape method, you minimize long-term damage 🌟.
Should I Just Buy a Waterproof Servo? 💰
If you frequently run in water or mud, the simplest solution may be to use servos made for it. Many manufacturers offer IP67-rated servos that are sealed from the factory. These sealed servos have internal O-rings and gaskets that block water intrusion, and often metal or coated gears to resist corrosion. With an IP67 rating, they can handle dust and brief immersion up to 1 meter.
For example:
- Flash Hobby 35KG Waterproof RC Servo – a high-torque digital servo for 1/8–1/10 scale cars and boats. It boasts an IP67 design, stainless steel gears, and aluminum housing. Users say it lets their RC “play with the river” without damage.
- AGFRC 40KG High-Torque Waterproof Servo – an IP67 aluminum-case servo popular in crawlers and buggies. (IP67 means 6 = dust-tight, 7 = water immersion up to 1m.)
- ANNIMOS 45KG Waterproof RC Servo – another IP67 servo suitable for 1/8–1/10 scale rigs.
These servos can save hassle, but they cost more. If your budget allows and you often race boats or run in the rain, a proper waterproof servo is a sound investment. Otherwise, DIY methods (balloon, grease, etc.) can still protect standard servos in lighter conditions.
Real-Life Example 🌊
One RC boater put it this way: “When we got our boat wet, we double-wrapped the receiver in ziplock and balloon, but it failed in saltwater quickly. Now we always use two balloons zipped tight and even fill the neck with grease” . Another hobbyist described doing a “balloon with dielectric grease” trick: after sealing with a zip tie, he says the grease “fills any voids” around the wires. These community stories show that combining tricks (double balloon, sealant, grease) often works better than one alone.
Frequently Asked Questions ❓
Q: What if water still gets into a ballooned servo? A: If water makes it inside, act fast. Remove power, open the case if possible, and dry thoroughly. Check for damage and reapply grease or replace components if corrosion has started.
Q: Can I use a regular ziplock bag instead of a balloon? A: Some try ziplock bags, but they tear more easily than balloons. In a saltwater test, one user found ziplocks failed faster than double balloons. Balloons (especially double-wrapped) tend to hold up better.
Q: Will grease cause servo stalling or heat? A: Use waterproof or silicone-based grease meant for RC use (like silicone diff grease or marine grease). Only a thin film is needed. Too much thick grease could slightly slow the servo, but proper grease enhances lubrication.
Q: How do I know if my servo is really waterproof? A: Factory-sealed (IP-rated) servos usually list it in the spec. For DIY methods, there’s no guarantee – always test by splashing lightly before a big run. Many hobbyists dunk a wrapped servo briefly to verify it doesn’t hiccup. Even then, treat it carefully.
Conclusion 🎉
Waterproofing your RC servos can save you money and frustration. By trapping air with a balloon or by using sprays, grease, and tape, you significantly reduce the chance of a wet electronics failure. Always remember the limits: balloon-wrapping is good for rain and splashes, but not for long submersion. Upgrade to a sealed servo if you need real depth protection. And after every wet run, clean and dry the servo thoroughly so it lasts.
Protect your servo before you hit the water. A few minutes of prep (balloon wrap, grease, tape) today means a working servo tomorrow. Happy (safe) driving out there! 🚗💨
Sources: Insights come from RC specialists and community forums like RCCarStars, Society of Robots, EuroRC, Reddit r/rcboats, Axial Adventure, RCtalk, Instructables, and RC-Sub Forum, along with product info and maintenance guides. These expert tips can help you trust the advice and keep your RC gear running smoothly.